Following my first modelling sessions, I wanted to learn more about the sculpting tool in Blender, and move past just using edit mode to design my character, so I dedicated some research into the tool.
What is Sculpt Mode?
‘Sculpt mode is similar to Edit mode in that it is used to alter the shape of a model, but Sculpt mode uses a very different workflow: instead of dealing with individual elements (vertices, edges, and faces), an area of the model is altered using a brush. In other words, instead of selecting a group of vertices, Sculpt mode automatically selects vertices based on where the brush is, and modifies them accordingly, as if you were sculpting clay.’
Brushes:
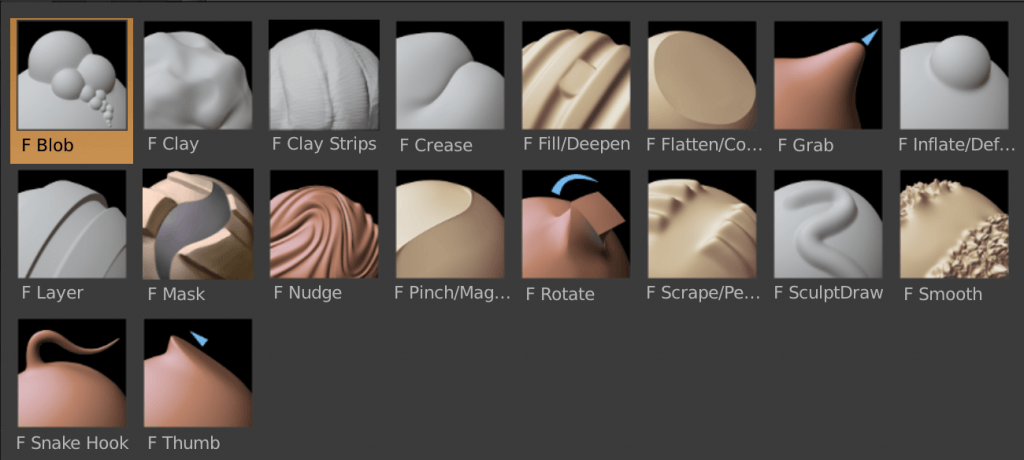
Blenders sculpting feature provides users with a set list of brushes, each causing a different effect when used, all indicated by the thumbnail and the name they have been given. Some have the same basic principle, but differ in the settings they offer. The settings can be altered to achieve the outcome desired. Those with two names have an option to perform the same effect but in reverse.
- Blob ~ Pushes the mesh in a spherical shape.
- Clay ~ Moves vertices inward or outward.
- Clay Strips ~ As above, but uses a cube test to define the brush area of influence.
- Crease ~ Creates sharp indents or ridges by pushing or pulling the mesh.
- Fill/Deepen ~ Brings vertices below the brush plane upwards.
- Flatten/Contrast ~ Pulls the vertices towards the Sculpt plane.
- Grab ~ Selects a group of vertices and pulls them to follow the mouse.
- Inflate/Deflate ~ Moves vertices inward or outward.
- Layer ~ Moves vertices inward or outward, but the height of the displacement layer is capped.
- Mask ~ Lets you select mesh parts to be unaffected by other brushes by painting vertex colors.
- Nudge ~ Moves vertices in the direction of the brush stroke.
- Pinch/Magnify ~ Pulls vertices towards the center of the brush.
- Rotate ~ Rotates vertices within the brush in the direction the cursor is moved.
- Scrape Peaks ~ Pulls the vertices towards the Sculpt plane., but only brings vertices above the plane downwards.
- SculptDraw ~ Moves vertices inward or outward, based the average normal of the vertices contained within the drawn brush stroke.
- Smooth ~ Eliminates irregularities in the area of the mesh within the brush area.
- Snake Hook ~ Pulls vertices along with the movement of the brush to create long, snake-like forms.
- Thumb ~ Flattens the mesh in the brush area.
Relevant Tutorials:
Too complex, need background on edit mode. Interesting brushes to download.
Puts the brushes many forms into practice.
Sources:
– Wiki.blender.org. (2017). Doc:2.4/Manual/Modeling/Meshes/Editing/Sculpt Mode – BlenderWiki. [online] Available at: https://wiki.blender.org/index.php/Doc:2.4/Manual/Modeling/Meshes/Editing/Sculpt_Mode [Accessed 15 Dec. 2017].

Leave a comment