Modelling Process Part 1 – The Head | Development

After finalising my 2D designs, It was time to begin modelling my character in Blender. My instinct was to begin with the head, here is my evidence and what I encountered during the modelling process.

Intended Outcome:

  • Have a completed head for my creature.
  • Become familiar with the ‘Sculpt’ mode in Blender.
  • Use the ‘Boolean’ modifier to create eye sockets.
  • Apply tools and tips I have learnt in previous experiments and tutorials.

First attempt:

I tried to begin modelling my character before I had done any detailed research and experimenting within Blender, and I was only familiar with basic tools. Because of this, my first attempt at modelling the head failed, as I could not gain the look I was hoping for. It was after this I decided to look into creating natural elements in Blender, and conducted the research shown in my ‘Creating Rocks in Blender’ research post. Here is a time-lapse of my first attempt, showing the struggles I faced.

Final Attempt:

After conducting research I became slightly more confident in when modelling. I was introduced to the sculpt tool which really helped me to create a natural looking form. Here is a time-lapse of my process.

Problems I encountered and how I overcame them:

  • Shaping the head proved harder than I had anticipated. Although my character is made of natural elements such as rock and/or sand and therefore gave me an excuse not to be uniform, creating a surface on which the creatures face would look equal took a few different sculpting tools to perfect.
  • I struggled to use the ‘Boolean’ tool to create natural looking eye sockets. To counteract this, I searched through the different sculpting tools and tested one called ‘Inflate/Deflate’. This left the effect I was struggling to get from a Boolean, allowing me to manipulate the sockets into similar yet non-identical eyes.

Where to go from here:

  • Begin modelling the torso and pelvis of my creature.
  • Seek further advice on using the sculpt tool to ease modelling.
  • Experiment past the sculpt tool, so not to limit what I work with within Blender.

Camera Mapping in Blender | Research

As I am hoping to apply my final 3D model to different backgrounds and environments, I began to think about how I wanted to create an appropriate output. One main output I shall be creating is still images, however along side this, it would benefit both me and my project to have a slight animation to my final piece to bring the model to life.

On Youtube, Blender Guru uploaded a tutorial on how to camera map a still image in Blender and create a moving picture as opposed to having a still image. I followed this tutorial to learn the basics.

My Time-lapse

The image we camera mapped in this tutorial was a simple example, with structure and elements that made creating realism rather easy. Because my model will be based in outdoor environments, ones with less symmetry, I may need to consider other tutorials and means of learning how to effectively create the scene I hope to.

I followed the main instructions in the tutorial, but refrained from adding too much detail. I was confident in the skills I had learnt throughout this tutorial that when I come to creating my own scene in Blender, I will be able to include more detail where needed to make the scene seem more realistic. Although the tutorial was helpful in the most part, he assumed this watching were more advanced than I was, so it took me longer than I expected to finish it. I relied heavily on google searches for things I couldn’t quite fix, such as having some material Nodes greyed out because I was not in the Cycles render engine, and when I missed parts of the tutorial I would have to rewind and watch again.

In the tutorial, Blender Guru mentions adding particles in his scene to add to the realism. I have not yet experimented with this function within Blender, and aim to experiment with adding things like this in the near future.
The Final Product

My final product was not as clear and precise as the tutorials, however I am rather satisfied with the result having come from a place of complete lack of knowledge with this tool. When I experiment further with this function, I will be sure to include a lot more detail.


Sources:

Guru, B. (2017). Available at: https://youtu.be/B9r9tKX5olY [Accessed 13 Nov. 2017].

Creature Biography | Research Agenda

In order to personify the creature I am creating, I chose to break his characteristics down and create a brief biography for him, without doing so, I would will have little sense of how they should act and react to what is happening around them in any given scene (Chapman, 2017). This would also help me to create a character that has depth, and can be transcribed into different environments without changing his personality.

Name: Unknown.
Age: 1000+
Gender: Male
Personality Traits: Shy, quiet and gentle.
Likes: Peaceful scenes. He like to people watch and watch the world pass by.
Dislikes: He doesn’t like to attract the attention of people he doesn’t quite trust.
Where do they live?: Currently, this creature is wandering the earth looking for other like him, with no specific home. During his quest, he blends into his surroundings in order to avoid detection from unwanted people in fear of being misunderstood.
Where are they from?: This creature was created on earth but animated by an unknown entity.
Appearance:

He is large and stocky with the ability to change the colour and appearance of his skin to match his surroundings. His eyes are hollow and he doesn’t appear to have any other features to his face. His large size often has people mistake him to be dangerous, however he is extremely gentle natured. He doesn’t speak any language known to men on earth, and appears to communicate through deep and soft purring and cooing.


Sources:

– Chapman, H. (2017). How to Create Character Profiles | Novel Writing Help. [online] Novel Writing Help. Available at: https://www.novel-writing-help.com/create-character-profiles.html [Accessed 13 Nov. 2017].

Creature Design in 2D | Development

Before I could begin creating any models in a 3D modelling software, I needed to have an idea of the starring creature in my project would look like. To do this, I began to sketch out ideas on paper and confirm the initial anatomy of the character.

Inspiration

Looking to inspiration, a key influence was a character from a video game I played as a child. In the original Rayman 2 game, the key antagonists are an army of Robo-Pirates lead by one Admiral Razorhead. Although these robots-pirates are mean enemies of the protagonist, as a child I used to play as this character in the following Rayman racing game Rayman M, where all characters were equal.

300px-Piratehenchman_800_by_deathtosquishies

Robo-pirates have a large torso made of metal, with large limbs made of different components, one a gun and the other a hook. His head looks to be like a knights helmet, rounded at the top and pointed at the chin. This creature is made out of metal, something that isn’t found in the natural environment, however its short stocky figure and their reaction to their surroundings does add an element of simplemindedness, making an almost childlike innocence.

Another inspiration to help me begin to design my final creature came from a Studio Ghibli design. The spirits in the film ‘Princess Mononoke’ have a minor role, however, their charming faces and small size made them an instantly recognisable part of the film. Their motif is simple, the spirits are white bodied, with slightly human-like features. They have two arms, two legs, two eyes, (some have) a nose and a mouth.

giphy

What inspired me about these characters was their emotionless faces. Their face consists of 3 to 4 circles, all varying in size, that bare no resemblance to any particular creature. This design adds innocence to their otherwise simple character design.

Beginning my design process

First off, I wanted to establish the size difference between the head and the torso of my creature. Once deciding this, I began the initial design of the body, experimenting with different shapes.

23030491_2102365009994558_1379025096_o

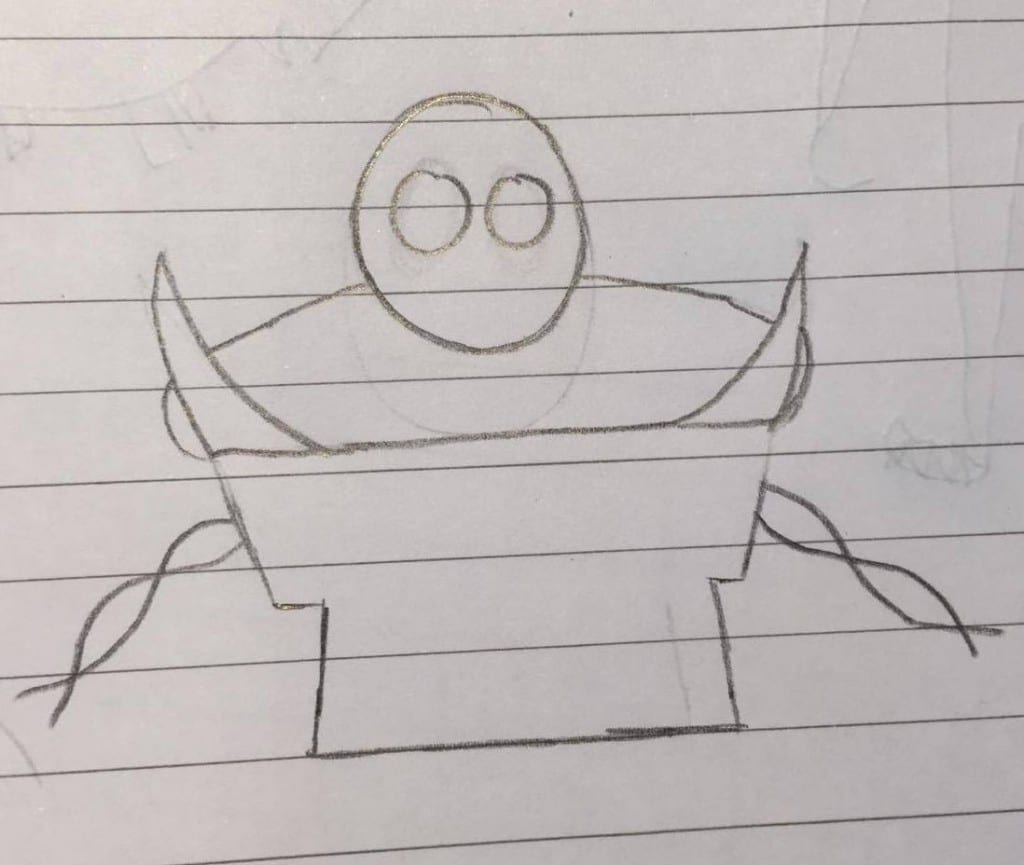
The above was the first sketch I made. I began by outlining a simple robo-pirate like shape and added on spikes to add an originality. During this time, I also experimented with how the limbs of the character would be attached to the main part of its body, and I initially wanted to use a vine-like system.

23023387_2102364993327893_394093021_o23030805_2102364996661226_577329455_o

After the initial, I drew two different sketches, one with a basic shape, the other with added spikes to the shoulders. Because I wanted to include more elements of the character that could be incorporated into the multiple backgrounds I intend to place it in. Adding the spikes means they may be susceptible to things the environments may be filled with, examples being caught in trees and vines, sticking out behind mountains, or even just having wildlife climb and settle in between them.

When sketching these two designs, I also chose to taper the bottom of the body, having its groin shapes like a typical pelvis, and the above torso slowly decreases to a lesser point.

23107553_2102365003327892_585387167_o

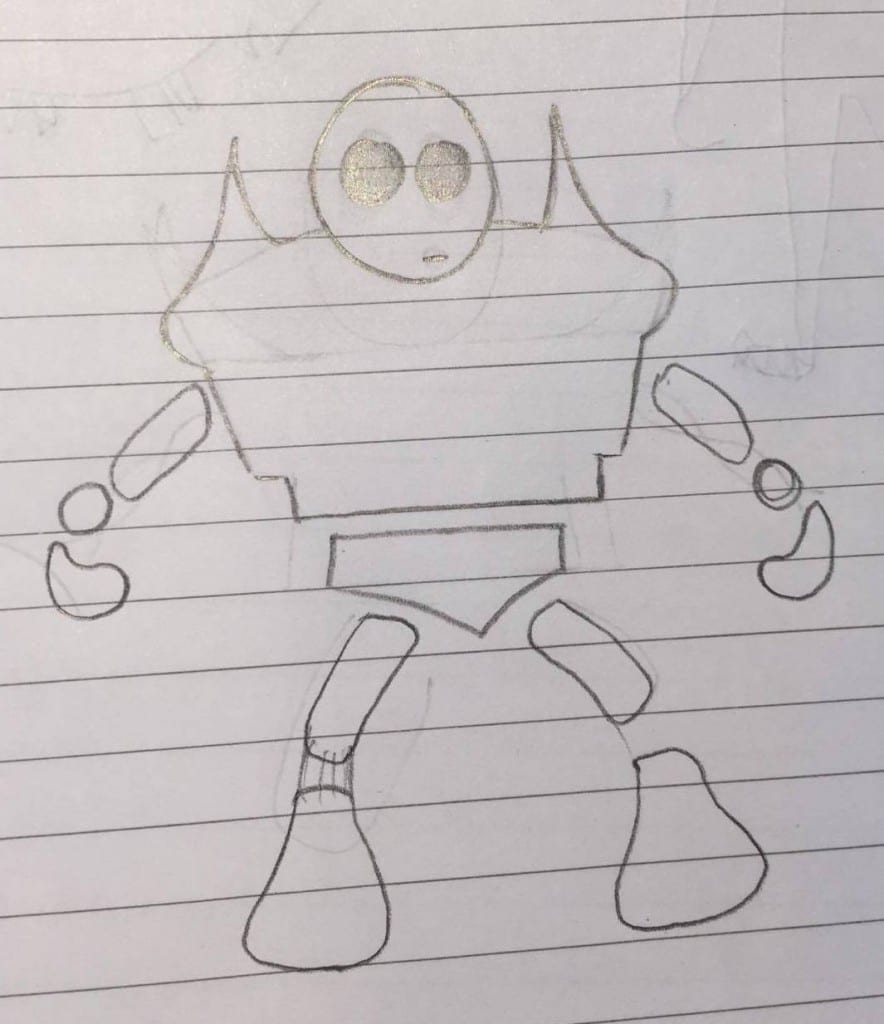
The next thing I needed to design is the limbs and accents of the character. To begin, I sketched simple anatomy fundamentals that fit the body of this creature. I initially intended to develop each limb further, but as I was developing certain parts, it became clear that the simple design I had already created worked extremely well. The feet of the character tapered at the top and became thick at the bottom, making it easy to blend with the group it stood on, and the thin legs seemed appropriate to make sure it doesn’t stand out further.

The arms began similarly to the legs, having a thin upper arm with a joint between that and the hand. When designing the hand, I began to make it rather small as well but felt this lost the human-like features I had hoped to create in order to make viewers experience empathy. Because of this, I added fingers and a thumb to the creature and enlarged them to keep in proportion with the feet.

FINAL DESIGN

23030470_2102364986661227_1611102765_o

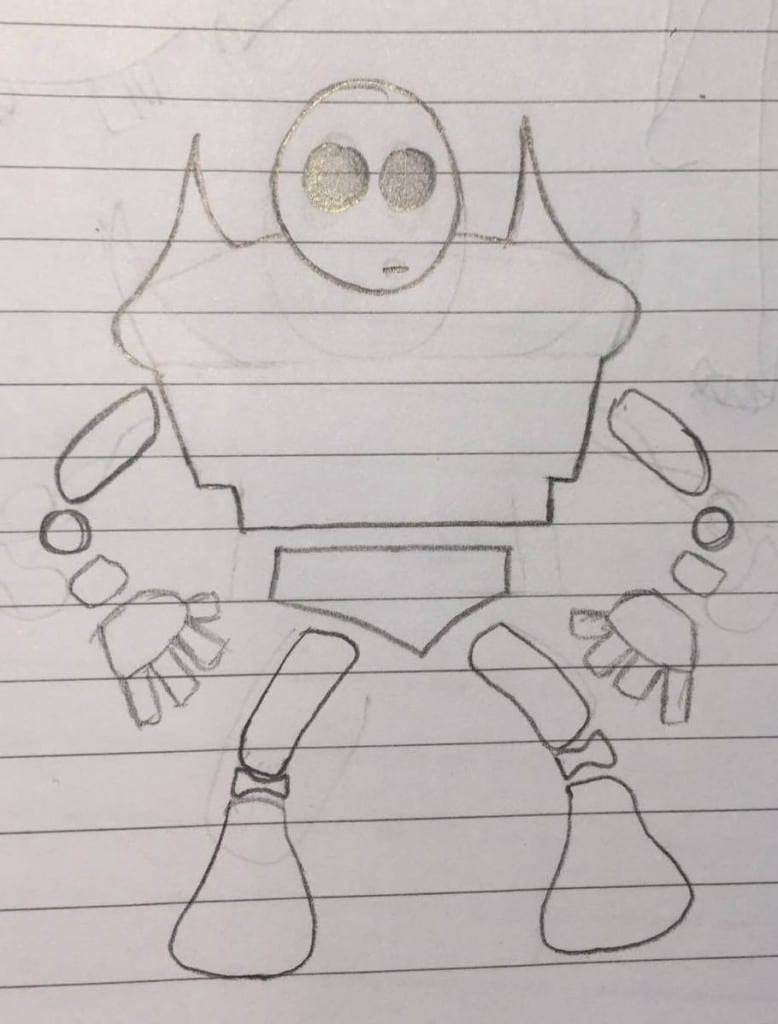
In the final design, I chose to add joints between the legs, for added realism, and also added a lower arm for practical mobility. Between the joints, in order for them to seem attached, I decided to leave blank, drawing them apart from each other for modelling purposes. This meant I could design each element whilst isolated, placing them relatively close to each other to insinuate they are attached.